Showing posts with label Tips and tricks. Show all posts

Tuesday, 30 October 2012

Best tip EVER!!

Carmel posted the other day about a nifty way to control and contain all those annoying loose threads that always seem to hang out of your bobbin box, well out of mine anyway...


She linked back to the original source of the idea and I have to say it's so simple but really, really handy.

What you do is cut this plastic tubing into very small pieces and then slit one side so it can be wrapped around the outside of the bobbin, thus securing the cotton.

I had attempted to buy little clips in the past that did exactly the same thing - but they were all sold out and I was supposed to be put on back order, but they never eventuated.

I sent 'The guy who lives here' to the hardware store (yeah right, like he had to be asked twice!), and while he couldn't find the dimension Carmel used, he came home with 20mm tubing and it wraps around and back onto itself where it just sort of sticks.
So it works brilliantly.

Whoever thought I would want to be heading off to the hardware store again... but here goes!

Wednesday, 3 October 2012

Out of the kitchen

If you are dropping in from Blogtoberfest - hello and welcome. 
Have a look around and leave me a comment so I can return the visit.

If you are a regular here then you will know that for me, time spent in the kitchen is time I could have better spent sewing...

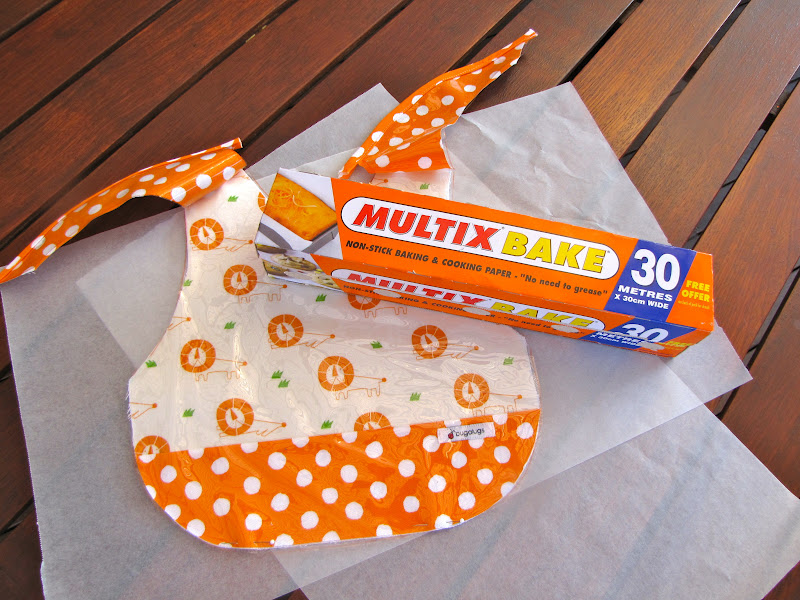
So it's kind of ironic that one of my most valued 'sewing tools' is good old trusty baking paper!


If you are sewing something that does not feed well through your machine - often a piece of baking paper under or over it will be all you need for smooth sailing.

When making these plastic coated bibs recently I used large pieces of baking paper over the plastic as I sewed to make it easier.  The baking paper stopped the plastic from sticking and dragging against the footbed of the machine, and made them much easier to sew.


The other main use I have for it is when sewing small ends of bias binding, straps and ties.

Putting baking paper under the end of a strip such as the one above ensures you can start sewing right at the end of the strip without it being pushed down into the machine and becoming jammed.

Give it a try - it makes a big difference.

I now have a small piece of baking paper there at the ready whenever I am sewing.

What about you - got any tips and tricks to share??

Thursday, 27 October 2011

Sewing stuff I've learned!

As you sew things you learn lots along the way, or I have at least!

Here are a few things I've learned over the past few years that have made me a better sewist/sewaholic and enabled me to produce garments with a more professional finish.


It's worth taking time to correctly transfer all notches from your pattern to your fabric.

This will make it much easier to ensure all pieces are correctly aligned as you sew them together, resulting in less frustration and a better fit.

Little snips are all you need.

The iron is your friend!

Press your seams to set them then iron them open.
Iron fabric before cutting.
Press pieces as you go for best results.

Use your iron for good!! Sew with it!

Pin for quality

Use glass headed pins - as Carmel says - they won't melt when you are using your friend the iron.
Always place your pins perpendicular to the seam, as shown below.
Get new pins when they become blunt - they aren't expensive but might save your sanity or your fabric!

Pinned and ready to sew


Take your time to properly prepare

As for the notches - take your time and correctly prepare all pieces - mark all buttonholes/buttons, pleat lines and dots for matching so that when it comes time to sew it will be quick and easy.
In order to do this use a good quality marking pencil - try a few til you find the one you like best.
Don't mark tonight, with a fading marker, the things you want to sew tomorrow!!

Marking the pin tuck lines for a Family Reunion dress

Do you have a tip that makes your sewing life easier??

I'd love to hear it if you do.

Monday, 10 January 2011

Pettiskirts: The low down

In case you are thinking of taking on a pettiskirt - here are a few things I have learned along the way.

Firstly - the construction.
It's simply a two layered, three tiered skirt.

There's a top tier (the band - made from satin, lycra or cotton)
Middle tier (nylon chiffon or 20 denier nylon)
Bottom tier, same as middle tier but with the ruffle attached to it.

You have two layers, composed as above, joined together via the top tier.
Easy, right!??

Ruffler vs no ruffler foot
You'll get differing opinions on this depending on who you ask.

My advice? - go for the foot if you have one or plan to sew a lot of ruffles in the future!

The difference is you can do it all in 'one pass', as opposed to running a gathering stitch, teasing the gathers by hand to get a good fit then pinning and sewing it to the next layer of the skirt.

This is the gather that I set my ruffler foot to, it's pretty tight as you can see.
I used different coloured cotton for the bobbin and top-threads.
Using the ruffler foot you get a single line of stitching to secure the ruffle.

Before even attempting to use your ruffler foot - download this free guide to using your ruffler - it's a lot of help believe me.


The Fabric
I got mine from Crafty Mamas and also Trimming and Remnants, I think most 'dance' fabric stores would have it.
It's called (in Australia) 20 denier nylon.
If you are in Australia, DON'T GET POLYESTER NYLON as this frays terribly and is really stiff compared to the 20 denier nylon.

You have to cut it into strips - lots of them, so if you live in the US then buy it in pre-cut rolls from here, the freight is pretty prohibitive for Aussies.
(I have heard there will be an Aussie site selling the rolls soon so will update this once I know details).


This is the ruffle attached to the third (bottom) tier of the skirt.
 Here it all is in a big pile - I am talking a seriously long piece of fabric!
Keep in mind - this is one tier from one layer.


The Pattern
I bought a pattern, I didn't find it very helpful - at least not as helpful as this tutorial.
This is ace.
Construction is simply explained and there are great tips on how to set your machine up to gather if you don't have a ruffler foot.

The only things I changed were;
I sewed both layers together at the top tier (waistband) when I did the top-stitching as I wanted them to be secured together, and
I didn't do the thread through ribbon with elastic - I did an elastic waistband and a separate ribbon as I didn't want the small children to accidentally pull the ribbon through and out of the casing.

So I roughed out the waist measurements, based on other items of clothing, as the girls were not here when I finished the skirts off.

The only problem with this is that if you do lots of jumping on the trampoline holding hands with your cousin or aunt...

This may happen!


Unless you start with your skirt up here...


The other thing I learned is that no matter how lovely your skirt, at the end of a busy Christmas day you might still get grumpy and refuse to wear it for a family photograph, despite your Mum's best efforts!


If you have any questions - seriously do let me know, either in comments or via email and I will be happy to help if I can.

PS - that small girl looks to have 'ditched' the daytime nappies since Christmas Day - hooray!